It’s Monday amd today we are building a pricing slider with Tailwind CSS and Alpinejs for your pricing page.
What is a pricing slider?
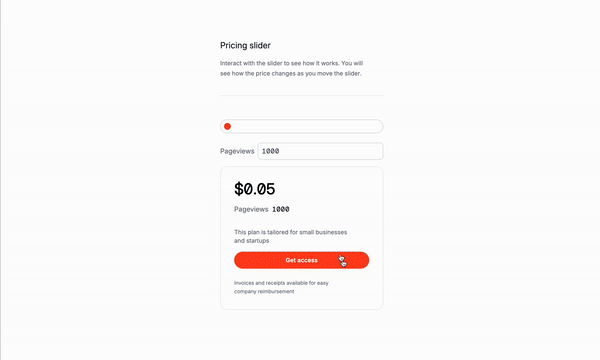
A pricing slider is a slider that allows you to select a price range. It is a great way to help your customers choose the right plan for their needs. You can use it to compare different plans, showcase your pricing tier options, or simply provide a way for your users to select a price.
Use Cases:
- Subscription Plans: Offering various subscription tiers tailored to different user needs.
- Product Pricing: Dynamically adjusting product prices based on user-selected features or usage metrics.
- Service Packages: Providing customizable service packages with different levels of features or support.
- Membership Levels: Offering different membership levels with varying access and benefits.
- Software Licensing: Implementing tiered licensing models for software products based on usage or functionality.
Let’s build the structure
Understanding the code:
x-data="{ pageviews: 1000, price: 0 }": This is the data that will be used to store the pageviews and price.@input="price = (Math.ceil(pageviews / 1000) * 0.001 * 50).toFixed(2)": This is the event listener that will update the price based on the pageviews.x-model="pageviews": This is the binding that will be used to bind the pageviews input to the component’s state.x-model="price": This is the binding that will be used to bind the price input to the component’s state.<span>$<input type="text" id="price" x-model="price" readonly /></span>: This is the HTML structure that will display the price in a read-only input field.<label for="pageviews">Pageviews</label>: This is the HTML structure that will display the label for the pageviews input.<input type="number" id="inputPageviews" x-model="pageviews" @input="price = (Math.ceil($event.target.value / 1000) * 0.001 * 50).toFixed(2)" />: This is the HTML structure that will display the pageviews input field and bind it to the component’s state.<input type="range" id="pageviews" x-model="pageviews" min="1000" max="1000000" step="1000" @input="price = (Math.ceil(pageviews / 1000) * 0.001 * 50).toFixed(2)" />: This is the HTML structure that will display the pricing slider and bind it to the component’s state.<label for="pageviews">Pageviews</label>: This is the HTML structure that will display the label for the pageviews input.<span x-text="pageviews.toLocaleString()"></span>: This is the HTML structure that will display the pageviews value in a read-only input field.
Classes are removed for brevity, but I’ll keep those classes relevant to the tutorial.
<div
x-data="{ pageviews: 1000, price: 0 }"
class="w-full">
<div>
<input
type="range"
id="pageviews"
x-model="pageviews"
min="1000"
max="1000000"
step="1000"
@input="price = (Math.ceil(pageviews / 1000) * 0.001 * 50).toFixed(2)""
/>
</div>
<div >
<label
for="pageviews"
>Pageviews</label
>
<input
type="number"
id="inputPageviews"
x-model="pageviews"
@input="price = (Math.ceil($event.target.value / 1000) * 0.001 * 50).toFixed(2)"
/>
</div>
<div
>
<p>
<span
>$<input
type="text"
id="price"
x-model="price"
readonly
/></span
>
</p>
<div>
<label
for="pageviews"
>Pageviews</label
>
<span x-text="pageviews.toLocaleString()"></span>
</div>
<p>
This plan is tailored for small businesses and startups
</p>
<div>
<button
>Get access</button
>
</div>
<p >
Invoices and receipts available for easy company reimbursement
</p>
</div>
</div>Conclusion
This is a simple pricing slider that can be used for various purposes, such as displaying different pricing tiers, showing the number of pageviews, or providing a way for users to select a price. Remember to maker it fully accessible and clear to the user when implemtenting the logic on your project.
Hope you enjoyed this tutorial and have a great day!
/Michael Andreuzza
One price.
Lifetime access.
-
34 Premium Astro Templates
-
All Future Templates Included
-
Unlimited Projects · Lifetime License