← Back to all tutorials 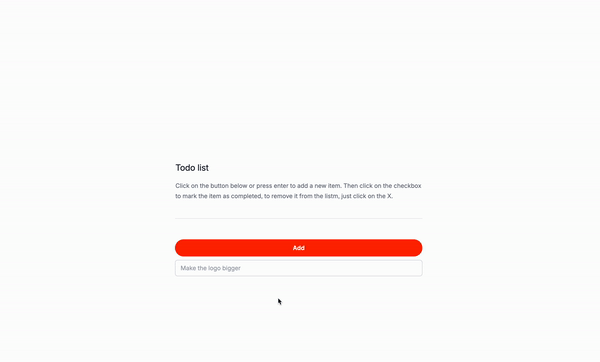
How to create a TODO with Tailwind CSS and Alpinejs
Published on
Apr 19 2024 by Michael Andreuzza
LEt’s build simple TODO app with Tailwind CSS and Alpine JS.
What is a TODO ?
A TODO is a list of things that need to be done. It’s a great way to keep track of tasks and prioritize them. It can be used for anything from personal projects to work tasks.
Use cases:
- Personal projects: Can be used to keep track of personal projects and tasks.
- Work tasks: Can be used to keep track of work tasks and deadlines.
- To-do lists: Can be used to keep track of to-do lists and tasks.
- Project management: Can be used to keep track of project management tasks and deadlines.
- Product planning: Can be used to keep track of product planning tasks and deadlines.
- Personal goals: Can be used to keep track of personal goals and progress.
- Daily tasks: Can be used to keep track of daily tasks and progress.
- Habits: Can be used to keep track of habits and progress.
Let’s build the structure
Understanding the code:
x-data="{ todos: [], newTodo: '', addTodo() { ... }, removeTodo(index) { ... }, initializeTodos() { ... } }": This is the data that will be used to store the todos.@click="addTodo": This is the event listener that will add a new todo when the button is clicked.x-model="newTodo": This is the input that will be used to store the new todo.@keydown.enter="addTodo": This is the event listener that will add a new todo when the enter key is pressed.x-for="(todo, index) in todos": This is the loop that will be used to iterate over the todos.:key="index": This is the key that will be used to uniquely identify each todo.<input type="checkbox" x-model="todo.completed">: This is the checkbox that will be used to mark each todo as completed or not.<span x-text="todo.text" :class="{ 'line-through': todo.completed }">: This is the text that will be used to display the text of each todo.<button @click="removeTodo(index)">: This is the button that will be used to remove each todo.
Classes are removed for brevity, but I’ll keep those classes relevant to the tutorial.
<div
  x-data="{
        todos: [],
        newTodo: '',
        addTodo() {
            if (this.newTodo.trim() !== '') {
                this.todos.push({ text: this.newTodo, completed: false });
                this.newTodo = '';
                localStorage.setItem('todos', JSON.stringify(this.todos));
            }
        },
        removeTodo(index) {
            this.todos.splice(index, 1);
            localStorage.setItem('todos', JSON.stringify(this.todos));
        },
        initializeTodos() {
            const storedTodos = localStorage.getItem('todos');
            if (storedTodos) {
                this.todos = JSON.parse(storedTodos);
            }
        }
    }"
  x-init="initializeTodos">
  <!-- Input to add new todo -->
  <div>
    <button
      @click="addTodo"
      >Add</button
    >
    <input
      type="text"
      x-model="newTodo"
      @keydown.enter="addTodo"
    />
  </div>

  <!-- List of todos -->
  <ul>
    <template
      x-for="(todo, index) in todos"
      :key="index">
      <li >
        <div >
          <div>
            <input
              type="checkbox"
              x-model="todo.completed"
            />
            <span
              x-text="todo.text"
              :class="{ 'line-through': todo.completed }"
            ></span>
          </div>
          <button
            @click="removeTodo(index)"
            ><svg>
               <!-- SVG Path -->
            </svg>
          </button>
        </div>
      </li>
    </template>
  </ul>
</div>
Conclusion
This is a simple TODO app that can be used to keep track of tasks and prioritize them. It can be used for anything from personal projects to work tasks. Remember that before using this code you will have to make it accessible to your users by adding the necessary HTML and CSS.
Hope you enjoyed this tutorial and have a great day!
/Michael Andreuzza